Two things I am TERRIBLE at, 1) before pictures 2) upright pictures. I think I may have some of the steps in pictures from my terrible camera, but these things have been all over pinterest. I just wish you could have seen the shape this frame was in before I rub-n-buffed it with gold leaf! My dad has been here for the last two weeks and I was finally able with his help to FINISH a bunch of projects. This magnetic black board is now in my dining room. My dad helped cut the metal sheet and fixed the frame. BTW I love chalkboard paint! Anyway here is how it turned out. We are planning on writing something on it, but I have terrible handwriting so I am waiting for my husband to figure out something to write.
Shoot, I guess I don't have a "before"! Well, here is the finished product from a different angle!
Friday, September 23, 2011
Tuesday, August 9, 2011
In love with my... grillmate!
Bought this grillmate at TJ's about a month ago. I think it was about $12 maybe? I absolutely loveeeee it! I use the grill side almost every night to cook up veggies or the occasional ham steak. The opposite side has a griddle, but I have not tried it out yet.
Sunday, August 7, 2011
Saturday, August 6, 2011
China Hutch Project
My sister-in-law (who is REALLY into china) suggested a while back to me that I paint the inside of my china hutch for more of a contrast. The entire hutch was white and I had white china. It was kind of blendy-iny.
I have been ignoring my china hutch for a while, as you can see I still have my Christmas china displayed (in August).
The Christmas china pops, but my china is lost against the white. I taped off some of the back sections and painted it the same color as my walls.
There was a pass through at some point which was walled up. I just stuck to the sunken wall (not sure what the technical term is) parts. The result below is very subtle.
My lighting doesn't do it justice. Also I only have 5 china settings, so I had to be creative!
Friday, August 5, 2011
Monday, August 1, 2011
Saturday, July 30, 2011
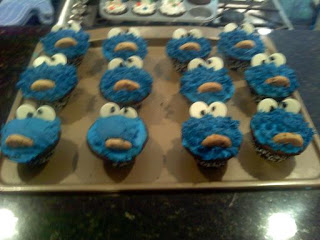
How not to become popular as a preschool mom... aka Cookie Monster cupcakes
In my defense, I really did not now just how much food coloring it would take to get a true Cookie Monster blue. I really should have purchased the Wilton Royal Blue food coloring, but I was short on time and has some store brand blue food coloring in my possession already. Well, they look really cute right? I used the grass tip for the hairy monster look. Found these guys on the web, and the person who posted how to make these mentioned that they could be quite tedious... the last two I could not even move my fingers to squeeze the bag, so they are hairless (or fuzz-less). To get the blue shade here I ended up using two entire containers of blue food coloring. Yes, my hands were stained for a few days.
When I picked up Maddie at preschool that day, I did check out the other kids to see if anyone (or everyone) was covered in blue dye. I think I escaped coloring any of the children, but I was sent home with the extra cupcakes. If you want to try these guys out I suggest using the Wilton's brand food coloring.
Barnyard Birthday
For Madeleine's and Cameron's 4th and 2nd Birthday, Madeleine wanted a Barnyard theme. After many weeks of shopping at the dollar store, we were able to pull together a real farm!
So, we already had "Summer Socks" (the horse) and the barn. I visited our local grain store to pick up a bale of straw. The store tried to sell me hay which has much better nutrition for horses. I had to explain that the only animals eating the straw/hay were not real. We either found the other animals at craft stores, a flea market, and of course, we made the pigs ourselves!
For the cake, I made piggy cupcakes and a barnyard cake with plastic animals that we had around the house. The barn behind the large cake is another Cape Cod flea market find!
For the piggy cupcakes, I used fruit flavored marshmallows for the ears, and the meltable chocolates found in most craft stores for the nose. The goody bags were actually baskets I found at the dollar store with farm related items including the piggy banks the kids painted during the party. The children also had to hunt for Mrs. Hen's eggs, using the plastic eggs I never got a chance to use last Easter.
I had so much fun putting the party together! Thanks everyone who came!
Subscribe to:
Comments (Atom)


